How to Install a Solar Charge Controller for an Electric Fence (Malaysia) | Pang Electronics
Installation
How to Install a Solar Charge Controller for an Electric Fence
How to Install a Solar Charge Controller for an Electric Fence
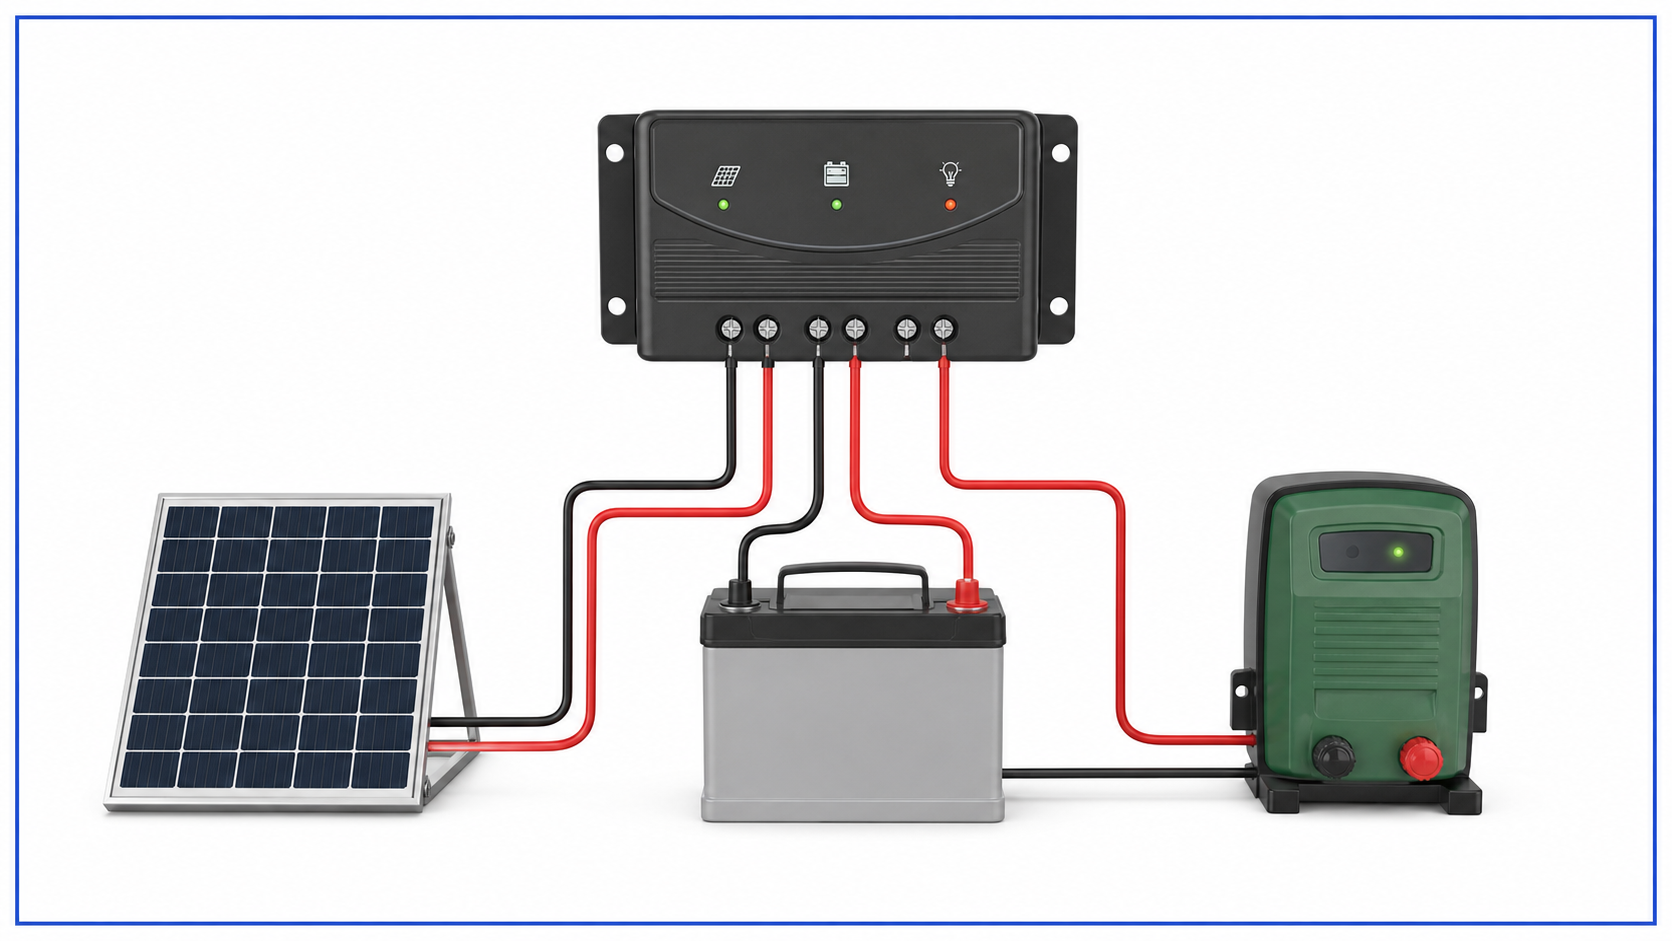
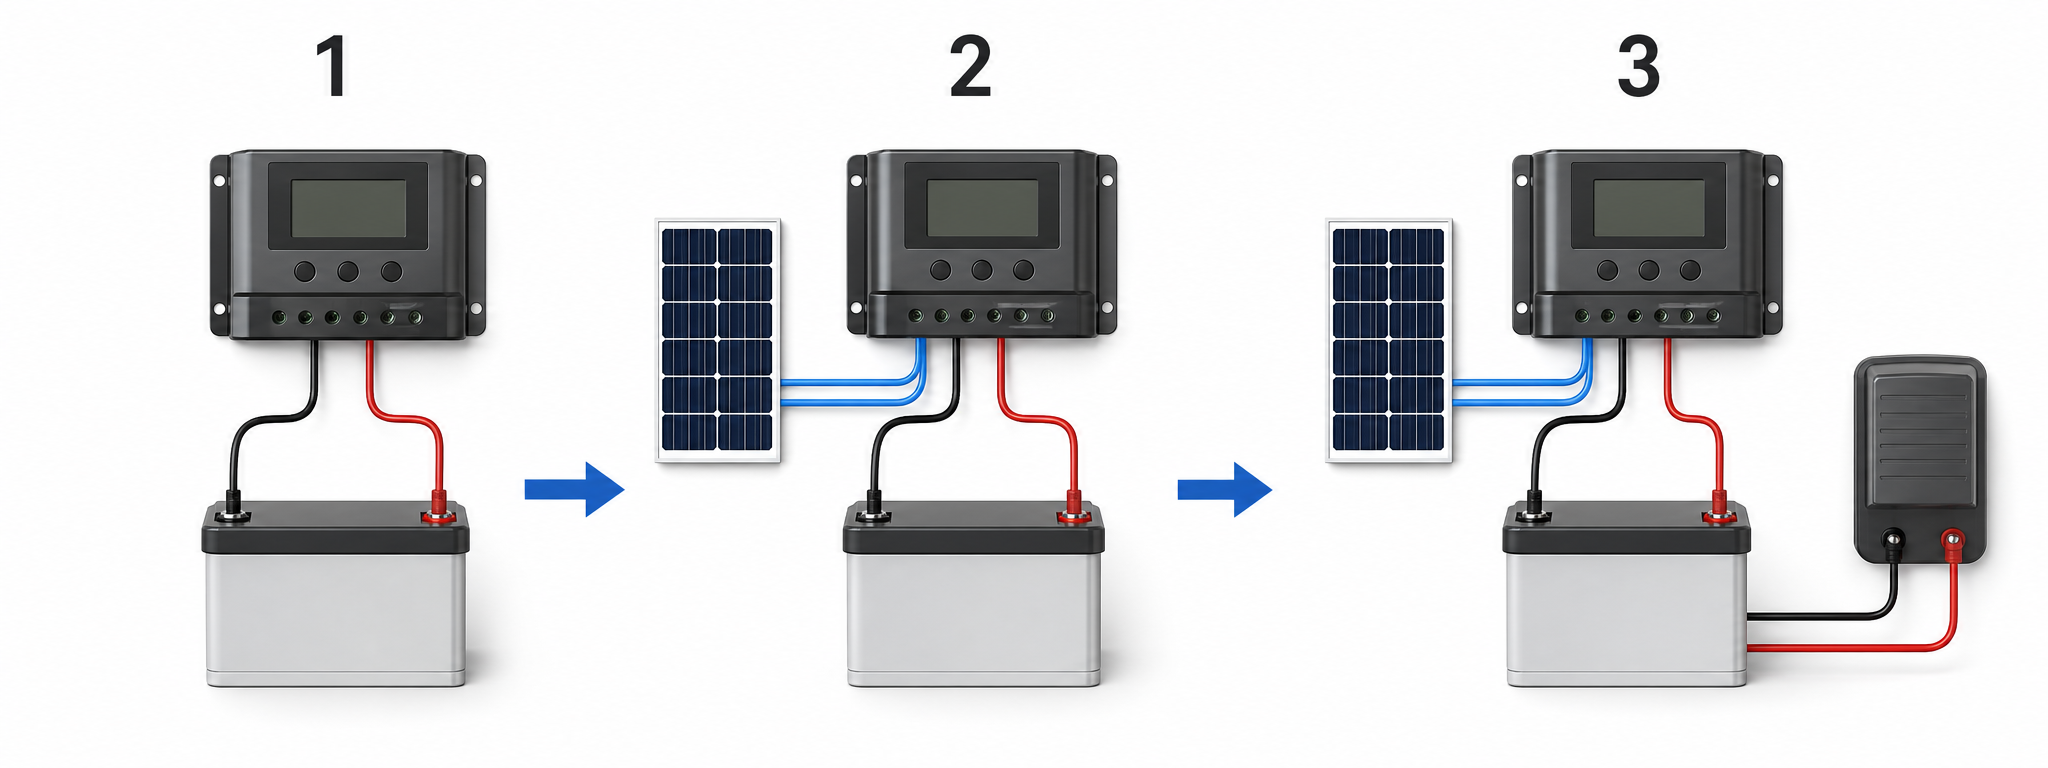
For a typical solar-powered electric fence, connect the battery to the charge controller first, connect the solar panel second, and connect the energizer to the battery last. To shut the system down or remove the battery, reverse the important power sequence: isolate the solar panel first, then disconnect the battery. This order lets the controller identify the battery-system voltage before solar power arrives and helps prevent controller damage.
This is a practical guide for a standalone 12 V electric-fence system. Always follow the manual supplied with the exact solar controller, battery and energizer in use; its terminal ratings, fuse sizes and battery profile override any general guide.
Safety first: Switch the energizer off before installation. Work in dry conditions, use insulated tools, keep positive and negative conductors apart, and check the terminal markings before every connection. A battery can deliver very high current if it is short-circuited.
The correct connection sequence
Use this sequence whenever installing or restarting a normal solar charge controller.
| Order | Connect | Why it comes now |
|---|---|---|
| 1 | Battery to controller | Powers the controller and allows it to recognise the system voltage and battery profile. |
| 2 | Solar panel to controller | Lets the controller begin controlled charging only after the battery is known. |
| 3 | Energizer to battery | Brings the fence load online after the charging system is working. |
Do not connect the solar panel directly to the battery or directly to an energizer. The panel must connect through a correctly rated solar charge controller.
Before you start
Gather the controller manual, battery manual, energizer manual, correctly sized cables, appropriate fuses or breakers, and a multimeter. Confirm all components use the same nominal system voltage, usually 12 V for smaller fence systems.
Check these points before making a live connection:
The controller is rated for the panel's open-circuit voltage and current.
The battery chemistry selected in the controller matches the actual battery: sealed lead-acid, AGM, gel, flooded lead-acid or lithium, as applicable.
Positive (+) and negative (-) terminals are clearly identified on the battery, controller, solar panel and energizer.
Frequently asked questions
Why must I connect the battery before the solar panel?+
Many controllers use the battery connection to start up and identify the system voltage. Connecting PV first can cause the controller to select the wrong voltage, fail to start correctly or be damaged, depending on the model.
Can a solar panel charge a completely flat fence battery?+
Do not assume it can. Some controllers need a battery with enough voltage to boot and identify the system, while a deeply discharged battery may be faulty or need recovery charging. Have a workshop test and charge it first if the controller cannot start or the battery is below its manufacturer's recovery limit.
What is the correct order to disconnect a solar controller?+
Turn off the energizer, isolate the solar/PV input, then isolate or disconnect the battery. This is the reverse of the normal power-up sequence.
Is 14.6 V always too high for a 12 V battery?+
No. It can be a normal absorption setting for some 12 V lead-acid batteries, but it may be too high for others and is not a universal lithium setting. Use the battery manufacturer's maximum charging voltage and the controller profile as the reference.
Should the energizer connect to the controller load terminal?+
Usually it should connect to the battery through its own correctly rated fuse. Only use the controller load terminal if both product manuals confirm it can carry the energizer's current.
What if I accidentally unplug the battery while solar is still connected?+
Isolate the PV input immediately, then check the controller manual and display for errors before restarting. Reconnect in the correct order: battery first, solar second.
Can I use a 24 V solar panel with a 12 V fence battery?+
Only if the controller manual explicitly allows the panel's open-circuit voltage and is configured for the 12 V battery system. Check the exact ratings before connecting it.
Does a bigger or higher-watt solar panel make the energizer more powerful?+
No. The solar panel's only job is charging the battery — its wattage affects how quickly and reliably the battery recharges, not the energizer's joule output or shock strength, which is fixed by the energizer itself. A higher-watt panel is worth sizing generously so the battery stays topped up through cloudy or monsoon periods, but it will not make the fence pulse stronger. See our [how many joules do I need](/guides/how-many-joules-do-i-need) guide if you actually need a stronger shock — that means a higher-output energizer, not a bigger panel.
When should I ask a workshop or installer for help?+
Get help for a swollen, leaking, overheating or repeatedly flat battery; an unknown battery type; wrong-voltage errors; damaged cables; blown fuses that recur; or a controller that still overcharges after its profile and wiring are verified.
The solar panel is isolated with its PV breaker/disconnect, unplugged, or covered so it cannot deliver power while the battery connection is being made.
The energizer is switched off and its fence-output terminals are not being handled as power terminals.
The battery already has usable voltage. A deeply discharged or failed battery may not let some controllers start correctly, and a solar panel alone may not recover it. If the controller will not boot, or the battery voltage is below the battery manufacturer's recovery limit, have the battery tested and charged with a suitable workshop charger before using the solar system.
Step 1: Connect the battery to the controller
Keep the PV/solar input isolated. Connect the battery cables to the controller's BATTERY terminals only, never to the PV terminals. Use the polarity printed on the controller:
Confirm the controller's battery setting and the battery's nominal voltage.
Fit the specified battery-side fuse or breaker as close to the battery positive terminal as practical.
Connect the controller battery positive cable to battery positive through that protection device.
Connect controller battery negative to battery negative.
Turn on the battery breaker or fit the fuse, then wait for the controller to start. Many controllers need a few seconds to recognise a 12 V or 24 V system.
Check the controller display or indicator. It should show a battery voltage consistent with the actual battery. If it shows an error, an impossible voltage, or no display, isolate the battery again and check polarity, fuse condition and the controller manual before continuing.
Step 2: Connect the solar panel to the controller
Only proceed after the controller has recognised the battery correctly.
Check the solar panel polarity and the controller's PV or SOLAR terminal markings.
Connect panel positive to controller PV positive and panel negative to controller PV negative, using the specified PV fuse, breaker or disconnect.
Restore the PV connection by uncovering the panel, closing the PV breaker or plugging in the dedicated connector.
Check the controller display for a charging indication when there is adequate sunlight.
The controller may not show useful charging current in low light, shade, or when the battery is already full. Keep the panel clean and free of leaf, branch and building shade.
Step 3: Connect the energizer to the battery
For most electric-fence systems, the energizer is a battery load. Connect it to the battery, using the energizer's own manual and recommended fuse; do not normally connect it to a controller's small LOAD terminals unless the controller and energizer documentation specifically say that terminal is suitable for the energizer's current draw.
Leave the energizer switched off.
Connect energizer positive to battery positive through the correct fuse or breaker.
Connect energizer negative to battery negative.
Confirm the solar controller still shows the correct battery voltage and charging state.
Turn the energizer on and test the fence using a dedicated fence-voltage tester.
Shutdown or battery removal: solar first, battery second
If the battery must be unplugged, replaced, serviced or moved, disconnect the solar input first. This is important because many controllers rely on the battery as their reference and can be damaged or misconfigured if the battery is removed while PV power remains connected.
Use this shutdown order:
Switch the energizer off.
Isolate or unplug the solar panel/PV input at its dedicated disconnect or breaker.
Confirm the controller is no longer charging from the panel.
Isolate the battery connection at its fuse or breaker, then disconnect the battery if required.
For restart, use the installation sequence again: battery first, solar second, energizer last.
What to do if charging voltage is too high
Check charging voltage against the battery manufacturer's allowed charging voltage and the controller's selected battery profile. Do not use one number for every battery chemistry.
For many 12 V lead-acid electric-fence batteries, a charging reading above 14.6 V is a warning to stop and check the system, especially if it remains above the battery's published absorption limit. Some lead-acid batteries use an absorption setting close to 14.6 V, while lithium batteries have different permitted limits. The battery label and manufacturer manual are the authority.
If the controller is charging above the permitted voltage, the display shows the wrong system voltage, or the battery becomes hot, swells, vents, smells unusual or leaks:
Switch the energizer off.
Isolate the solar panel/PV input first.
Isolate the battery second.
Check battery chemistry, controller battery type/profile, 12 V/24 V system setting and cable polarity.
Do not reconnect until the settings and battery condition have been checked. If in doubt, take the battery and controller to a qualified workshop or installer.
Never try to correct an over-voltage problem by repeatedly reconnecting live cables. Start over with all power sources isolated and follow the sequence above.
Quick troubleshooting table
| Symptom | First checks |
|---|---|
| Controller does not turn on | Battery charge, battery fuse/breaker, polarity and controller battery terminals. |
| Solar is connected but no charge is shown | Daylight/shading, PV breaker, PV polarity, panel voltage and correct battery profile. |
| Controller shows wrong battery voltage | Isolate PV first, then battery; confirm 12 V/24 V configuration and reconnect battery first. |
| Battery will not recover | Stop relying on the panel alone; have the battery tested and externally charged if it is deeply discharged. |
| Charge voltage is above the battery limit | Isolate PV first, then battery; check controller profile and battery chemistry before restart. |
| Energizer stops when it is connected | Check energizer fuse, battery condition, cable size and whether it was incorrectly connected to a controller load terminal. |