
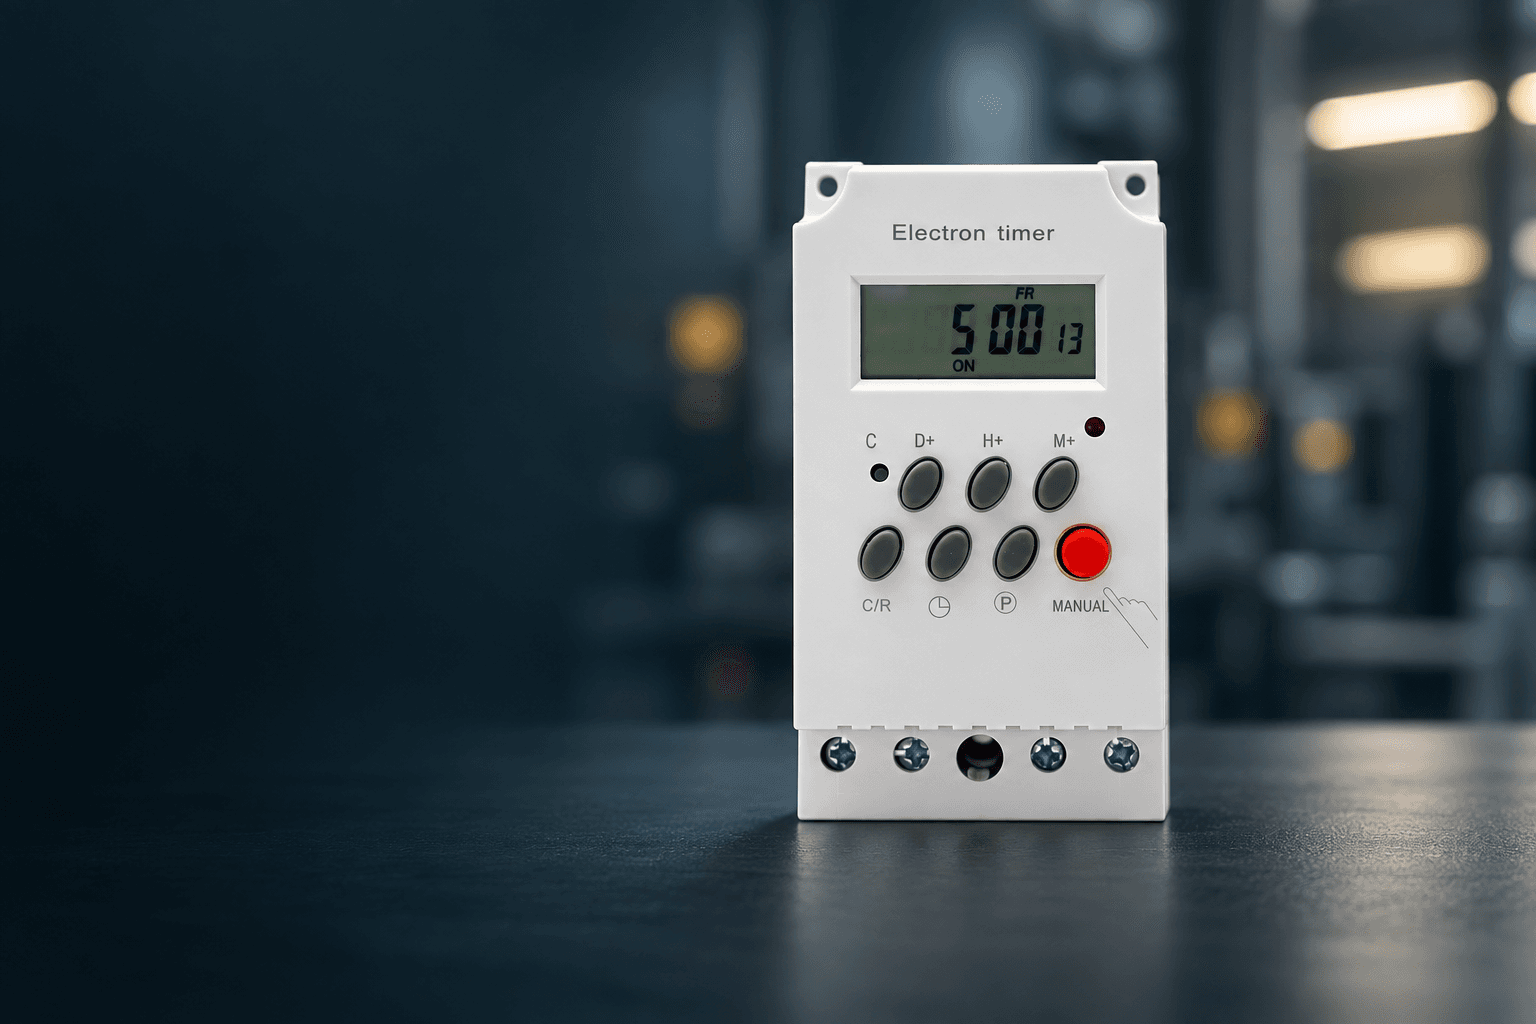
Quick start
- 1Hold CLOCK and press D+ for today, H+ for the hour and M+ for the minute. Release CLOCK.
- 2Press P for 1 ON. Choose the operating days with D+, then the start time with H+ and M+.
- 3Press P for 1 OFF. Choose the same days, then the stop time with H+ and M+.
- 4Press CLOCK to finish. Press MANUAL until AUTO appears, then test the next ON and OFF events.
Set the current day and time
Do this first. The timer needs to know the real time before it can run your schedule. CLOCK is the button marked with a clock symbol.
- Press and hold CLOCK. Keep holding it during steps 2–4.
- Press D+ until today's weekday appears.
- Press H+ until the current hour appears.
- Press M+ until the current minute appears.
- Release CLOCK.
- Check that the normal display shows the correct day and time.
Example: For Monday at 2:30 pm, set MO 14:30. The timer uses a 24-hour clock: 08:00 is 8 am; 18:00 is 6 pm.
If your timer has a keypad lock
If a lock symbol is visible, press C/R four times to unlock. The supplied sheet says lock-equipped versions set the live clock with D+, H+ and M+ directly after unlocking. Use the controls for your version.
Set the switch-ON time — 1 ON
An ON setting tells the timer when to supply power to the connected equipment.
- Press P once. Check that 1 ON appears.
- Press D+ to choose the day or group of days.
- Press H+ to set the start hour.
- Press M+ to set the start minute.
- Check the days and time before continuing.
Everyday example: Select MO TU WE TH FR SA SU, then set 08:00.
Minimum programming interval: 1 minute
Set ON and OFF times using H+ and M+. This timer does not support programming in seconds.
Set the switch-OFF time — 1 OFF
The matching OFF setting tells the timer when to stop supplying power.
- Press P again. Check that 1 OFF appears.
- Press D+ to select the same day group as 1 ON.
- Press H+ to set the stop hour.
- Press M+ to set the stop minute.
- Check the days and time.
Everyday example: Select MO TU WE TH FR SA SU, then set 18:00.
Complete both halves of the schedule
Setting only 1 ON does not create a switch-OFF time. For this same-day example, set both 1 ON and 1 OFF with the same days.
Finish and select AUTO
- Press CLOCK to return to the normal time display.
- Press MANUAL until AUTO appears.
- Recheck the current weekday and time.
- Observe the next scheduled ON and OFF events to confirm the equipment operates correctly.
| Display | What it does |
|---|---|
| ON | Keeps the output switched on manually. |
| AUTO | Runs the saved schedule. |
| OFF | Keeps the output switched off manually. |
After a manual test, always return to AUTO. Do not assume switching to AUTO immediately changes the output; check the next scheduled event.
Worked example — ON at 08:00, OFF at 18:00
Use one program pair to run equipment from 8 am to 6 pm every day.
| Screen | Days to select | Time |
|---|---|---|
| 1 ON | MO TU WE TH FR SA SU | 08:00 |
| 1 OFF | MO TU WE TH FR SA SU | 18:00 |
| Normal clock | Today's actual weekday | Current time |
| Operating mode | AUTO | Saved schedule active |
Button sequence: CLOCK + D+/H+/M+ → P → set 1 ON → P → set 1 OFF → CLOCK → MANUAL to AUTO.
For weekdays only, choose MO TU WE TH FR on both program screens.
Know your timer and buttons
| Button | Function |
|---|---|
| CLOCK (clock symbol) | Set the live clock; return from programming. |
| D+ | Select weekday or day group. |
| H+ | Set the hour. |
| M+ | Set the minute. |
| P | Open and review ON/OFF programs. |
| MANUAL | Select ON, AUTO or OFF on the live display. |
| C/R | Clear or recall the selected program; unlock supported versions with four presses. |
| C (recessed) | Reset timer settings. |
Reset is not needed for everyday setup
The recessed C button resets settings. Record your schedule before using it, then check and re-enter the clock and programs as needed.
Choose the operating days
Press D+ while viewing an ON or OFF program. Stop when the required days are displayed; use the displayed days rather than counting button presses.
| Displayed days | Runs on |
|---|---|
| MO TU WE TH FR SA SU | Every day |
| MO TU WE TH FR SA | Monday–Saturday |
| MO TU WE TH FR | Monday–Friday |
| SA SU | Saturday and Sunday |
| MO WE FR | Monday, Wednesday and Friday |
| TU TH SA | Tuesday, Thursday and Saturday |
| MO TU WE | Monday, Tuesday and Wednesday |
| TH FR SA | Thursday, Friday and Saturday |
| MO / TU / WE / TH / FR / SA / SU individually | One selected weekday |
The eight groups plus seven individual weekdays provide 15 day selections.
Add, review or clear programs
Add another schedule
- After 1 OFF, press P to reach 2 ON.
- Set its days and start time.
- Press P for 2 OFF and set its matching days and stop time.
- Repeat only for the schedules you need. The supplied sheet lists up to 28 ON/OFF pairs.
- Press CLOCK, then leave the timer in AUTO.
Review or remove a schedule
- Press P repeatedly to find the required ON or OFF entry.
- Check its days and time.
- Press C/R to clear the selected entry and check that the time is blank/dashes. Pressing C/R again can recall it.
- To remove a complete schedule, clear both its ON and OFF entries.
- Review unused entries, then press CLOCK and select AUTO.
Do not use 00:00 to mean cleared: midnight is a valid switching time. Avoid overlapping schedules until you have tested how the complete sequence operates.
Product and technical reference
| Item | Reference |
|---|---|
| Programming | Daily or weekly ON/OFF schedules |
| Capacity | Up to 28 ON/OFF pairs, according to the supplied sheet |
| Display | LCD with 24-hour clock |
| Time setting | Hours and minutes |
| Minimum programming interval | 1 minute |
| Supply | Use only the voltage and AC/DC type marked on your unit |
| Clock accuracy | Original sheet: approximately 1 second/day at 25°C |
| Power consumption | Original sheet: ≤2 W |
| Ambient temperature | Original sheet: −10°C to +40°C |
| Ambient humidity | Original sheet: 35–85% RH |
The minimum programming interval is 1 minute. The clock accuracy specification describes timekeeping error, not the switching interval.
Wiring and installation
This supplied diagram shows the four-terminal switched-supply AC version. Other versions can have a different output arrangement.
| Terminal | Connection in this diagram |
|---|---|
| 1 | POWER L — incoming live |
| 2 | POWER N — incoming neutral |
| 3 | LOAD N — load neutral |
| 4 | LOAD L — switched live to the load |
- Isolate the supply before working on any terminals.
- Match the unit's voltage, AC/DC type, terminal markings and output diagram.
- Have a qualified installer connect the supply and load using correctly rated cable and protection.
- Secure the terminals and covers before restoring power.
- Set the clock and schedule, select AUTO, and test both switching events.
For DC or volt-free-contact versions, follow the diagram on that specific unit; do not apply this AC L/N diagram to them.
Disconnect power before wiring
Mains wiring must be performed by a qualified electrician. The 25 A marking in this illustration is not a rating for every model or load type. Follow the supplied unit's rating and use suitable switching equipment for the connected load.
Troubleshooting
The timer switches at the wrong time. What should I check?
Check the live weekday and 24-hour time first. Then review the ON and OFF times and selected days. 18:00 means 6 pm.
Why does the equipment stay on or stay off?
Return to the clock display and confirm AUTO, not forced ON or OFF. Check that both halves of the schedule are set, then observe the next scheduled event. If it still fails, have the supply, load and wiring checked safely.
Why do the buttons not respond?
If your version shows a keypad lock symbol, press C/R four times to unlock. Do not press the recessed C reset button just to unlock.
What is the minimum programming interval?
The minimum programming interval is 1 minute. Set the hour with H+ and the minute with M+. This timer does not support programming in seconds.
Why does it switch on an unexpected day?
Review the D+ day group for every active ON and OFF entry. For the same-day examples in this guide, both entries must use the same days. Check unused programs for extra events.
What should I check after a power interruption?
Check the live clock, saved programs and AUTO mode before relying on the timer. A retained display or program does not mean the connected equipment has power.
Products this manual covers


Looking for articles instead of a manual? Browse our Guides.